Use the Using the Command Bar guide for a complete map of Workspace, Reader tools, Editor tools, and the Reader, Editor, and Split document views.
Using Telescopo Navigator
Telescopo Navigator is included with Telescopo Markdown Studio for moving through long Markdown and technical documents.
Navigator builds a live outline from your document structure, then lets you jump between sections without manually scrolling through the entire file.
Use Navigator for:
- Large Markdown documents.
- Engineering design docs.
- READMEs.
- Research notes.
- Product specs.
- Runbooks.
- Code and technical reference files where symbols or sections are available.
In Reader view, Navigator expands directly in the command bar with previous section, current section, and next section controls. Select the current section title to open the full outline.
In Editor and Split views, select Navigator from the Reader tools in the command bar to open the outline.
To use Navigator:
- Open a supported document.
- Use the expanded chapter control in Reader view, or select Navigator from the Reader tools in Editor or Split view.
- Select a section from the outline.
- Use Left and Right arrow shortcuts to move between dynamic sections where supported.
Navigator is most useful when your Markdown file uses a clear heading hierarchy:
# Project

## Overview

## Architecture

### API

### Database

## Deployment
Using Live Monitoring
Live Monitoring is included with Telescopo Markdown Studio and watches an open Markdown file for changes made outside Telescopo.
It is designed for workflows where another app, script, AI coding tool, or agent is modifying the file while Telescopo is open as the reading and preview surface.
Use Live Monitoring when:
- An AI coding assistant is editing a Markdown file.
- A script is generating a report.
- Another editor is saving changes to disk.
- You want Telescopo to stay current without manually reloading.
To use Live Monitoring:
- Open a local Markdown file.
- Open Workspace from the command bar.
- Turn on Live Monitoring.
- Keep the file open while another app changes it.
When changes are detected, Telescopo refreshes the document while preserving the reading context as much as possible.
Creating a New Markdown Document
Creating documents is part of Telescopo Markdown Studio.
To create a new document:
- Click New Document on the welcome screen or in Workspace.
- Choose a blank Markdown file or a template.
- Select a save location.
- Start writing in the Telescopo editor.
Telescopo opens new Markdown documents in the editing workspace so you can write source Markdown and see the rendered preview side by side.
Using Markdown Templates
Telescopo Markdown Studio includes 200+ templates across practical writing categories.
Template categories include:
- Planning.
- Product work.
- Engineering documentation.
- Finance.
- Education.
- Writing.
- Meetings.
- Research.
- Operations.
- Personal organization.
Templates are normal Markdown files. After you create a document from a template, you can edit it like any other Markdown file.
Templates are useful when you want structure without starting from a blank page. They can help with project plans, decision records, meeting notes, specs, study notes, financial trackers, and reusable documentation.
Using Split-View Editing and Live Preview
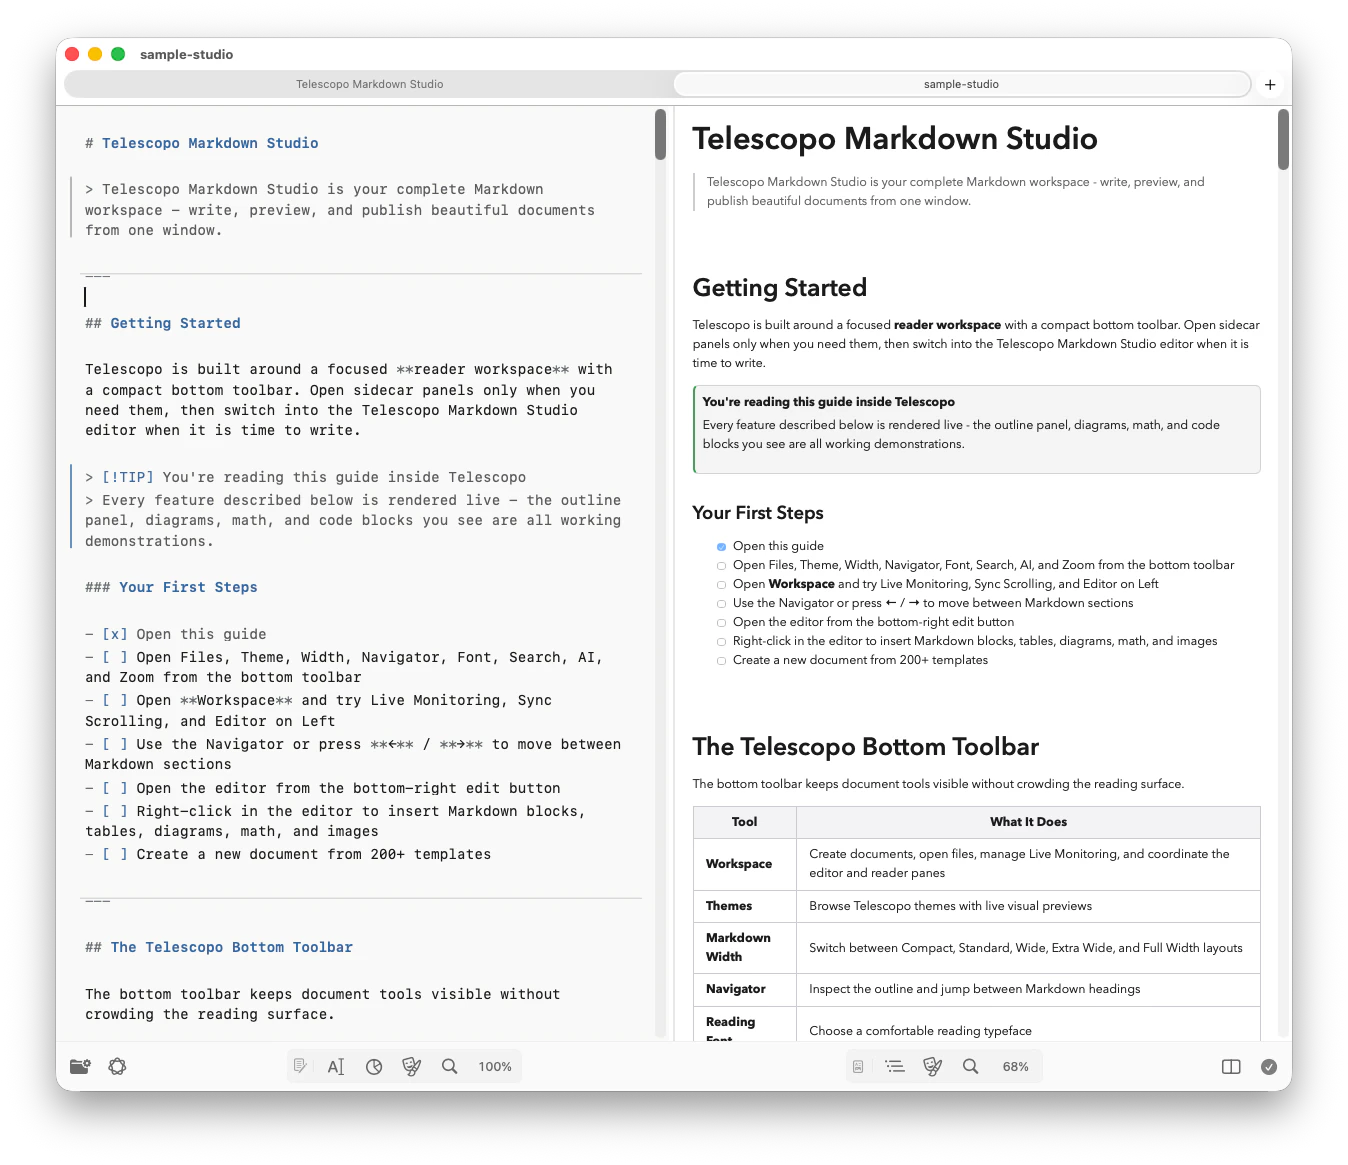
Telescopo Markdown Studio includes a split-view editor for writing and previewing Markdown in one workspace.
Use the central document-view control in the command bar to choose Reader, Editor, or Split.
In Split view:
- The editor shows the Markdown source.
- The preview shows the rendered document.
- You can switch between Reader, Editor, and Split views where supported.
- Reader tools and Editor tools remain available in their separate command groups.
Use split view when:
- Writing documentation.
- Checking Mermaid diagrams.
- Editing LaTeX math.
- Building a document for PDF export.
- Reviewing headings, links, tables, and callouts as you write.
The editor is currently focused on Markdown and Markdown-like documents. Other formats may open in preview or code reading modes instead.
Inserting Mermaid Diagrams
Telescopo Markdown Studio includes insert tools for Mermaid diagrams.
To insert a Mermaid diagram:
- Open a Markdown document in Telescopo.
- Switch to Editor or Split view.
- Open Diagrams & Math from the Editor tools, or right-click in the editor.
- Select the diagram type.
- Edit the inserted code block.
Mermaid diagrams use fenced code blocks labeled mermaid:
flowchart TD
    A[Start] --> B[Write Markdown]
    B --> C[Preview in Telescopo]
    C --> D[Export PDF]
Telescopo renders more than two dozen Mermaid diagram types inline inside Markdown. The supported set includes flowcharts; sequence, state, journey, and timeline diagrams; class, entity relationship, requirement, and Git graphs; C4 context, container, component, dynamic, and deployment diagrams; Gantt charts, Kanban boards, event modeling, mindmaps, pie, donut, and quadrant charts; plus block, Ishikawa, packet, Sankey, treemap, and XY diagrams.
Most diagrams use a mermaid fence. Telescopo also supports Azure DevOps-style :::mermaid containers. Donut charts use Mermaid pie syntax with the donut-hole configuration.
ZenUML uses a dedicated zenuml fence for code-shaped sequence diagrams. It supports participants, synchronous and asynchronous messages, creation and reply messages, nested interactions, comments, loops, alternatives, optional and parallel fragments, and try/catch/finally flows.
Using Mermaid Diagram Magnification
Mermaid diagram magnification helps inspect dense diagrams without leaving the document.
Use it when:
- A diagram is too wide.
- Text inside the diagram is small.
- You want to inspect a specific node or connection.
Open the magnifier on a Mermaid diagram, then move over the area you want to inspect. The magnified view follows the area under the cursor and is especially useful for complex architecture diagrams, flowcharts, sequence diagrams, and exported documentation checks.
Saving Mermaid and ZenUML Diagrams as SVG
Rendered Mermaid and ZenUML diagrams can be saved as standalone SVG files for documentation, presentations, design handoffs, or reuse outside the original Markdown document.
To save a diagram as SVG:
- Open the Markdown document in Reader or Split view.
- Right-click the rendered Mermaid or ZenUML diagram.
- Choose Save as SVG.
- Select a destination on your Mac.
Telescopo saves the rendered diagram as a separate vector file. The Markdown source remains unchanged, and the SVG stays crisp when resized.
Inserting LaTeX Math
Telescopo supports LaTeX-style math inside Markdown through KaTeX rendering.
Inline math uses escaped parentheses:
The result is \(E = mc^2\).
Display math uses double-dollar or escaped-bracket delimiters:
$$
\int_0^1 x^2 dx = \frac{1}{3}
$$
Use LaTeX math for:
- Research notes.
- Education.
- Technical writing.
- Engineering explanations.
- Machine learning logs.
- Financial or analytical documents with formulas.
Telescopo includes improved handling so ordinary dollar amounts in financial documents are less likely to be mistaken for math.
Inserting Tables, Callouts, and Markdown Blocks
Telescopo Markdown Studio insert tools help add structure without memorizing syntax.
Open Markdown from the Editor tools to browse formatting, headings, lists and tasks, tables, callouts, content blocks, highlights, footnotes, images, and wrapping tools. You can also right-click in the editor or press ⌘/ to open insertion commands at the caret.
Useful inserts include:
- Tables.
- Callouts and admonitions.
- Mermaid diagrams.
- LaTeX math.
- Common Markdown blocks.
These tools are designed to keep writing fast. Insert the structure, then customize the content.
Exporting Markdown to PDF
PDF export is included with Telescopo Markdown Studio.
To export:
- Open a Markdown document.
- Choose Export as PDF from Workspace or the app menu.
- Review the PDF preview.
- Choose portrait or landscape orientation.
- Adjust margins and paper size.
- Save the PDF.
PDF export preserves:
- Rendered Markdown.
- Mermaid diagrams.
- LaTeX math.
- Syntax highlighting.
- Theme styling.
- Typography.
Landscape export is useful for wide diagrams, tables, and technical documentation.
Changing Themes
Telescopo Markdown Studio includes practical light, dark, contrast, specialty, and animated themes.
The complete theme library is available during the 7-day trial and with Lifetime Access.
Themes affect:
- Markdown rendering.
- Code highlighting.
- The application and command-bar appearance where supported.
- Diagrams and visual containers where supported.
- PDF export styling.
Reader and Editor themes are controlled independently:
- Open Reader Theme from the Reader tools to style the rendered document.
- Open Editor Theme from the Editor tools to style Markdown source.
- Use Settings to coordinate either surface with the application appearance or choose specific themes.
Changing Fonts, Zoom, and Reading Width
Telescopo includes controls for comfortable reading on different displays.
Reader and Editor controls are separate:
- Reader Zoom & Width changes rendered-document zoom, reading font, code font, and column width.
- Editor Zoom scales Markdown source without changing Reader zoom.
- Reader Theme and Editor Theme control the appearance of their respective surfaces.
Reading width is useful when Markdown lines feel too wide on a large display or too constrained on a smaller screen.
Using Search
Search follows the active document view:
- In Reader,
⌘Fsearches the rendered document. - In Editor or Split,
⌘Fsearches Markdown source. - In Editor or Split,
⌘⌥Fopens Editor Search & Replace.
Search is useful for:
- Large Markdown files.
- READMEs.
- Technical documents.
- Code files.
- Research notes.
Telescopo does not need search text for analytics or tracking, and it does not upload document contents to a Telescopo server.
Markdown command tools and shortcuts
Editor and Split views provide Markdown commands for formatting and inserting structured content.
⌘/opens the insert menu at the caret.⌘B,⌘I, and⌘Kapply bold, italic, and link formatting.⌘⇧Tinserts a table.⌘⇧Minserts a Mermaid flowchart.⌘⇧Linserts a LaTeX block equation.⌘⌥Iinserts Markdown image syntax.
The Markdown and Diagrams & Math panels include additional headings, lists, tasks, callouts, code blocks, highlights, footnotes, images, Mermaid diagrams, and LaTeX templates.
Adding images in the editor
Use Markdown > Images in Editor or Split view to insert local-path or remote-image syntax.
- Local Image inserts Markdown syntax with a path placeholder. Replace it with a relative path whenever possible.
- Remote Image inserts Markdown syntax for an HTTPS image URL.
- Pasting image data can save the image into a
mediafolder beside the current Markdown document. Telescopo then places the generated Markdown syntax on the clipboard so you can paste it into the editor.
Telescopo does not upload local images. Remote images are fetched from the server referenced in the Markdown file.
Using the AI Assistant
AI Assistant is included with Telescopo Markdown Studio on supported Macs.
It can help with:
- Asking questions about the current document.
- Summarizing long Markdown files.
- Extracting key points.
- Understanding technical content.
- Reviewing research notes or documentation.
AI Assistant uses Apple Intelligence where available and is designed for fully local, on-device document Q&A and summarization on supported Macs.
Requirements depend on Apple Intelligence availability on your Mac and macOS version.
Opening Linked Markdown Files in New Tabs
Telescopo can open linked Markdown files in new tabs when the target file can be resolved and macOS permits access.
Supported link styles include standard Markdown links and wiki-style links:
[Architecture](architecture.md)
[[architecture.md]]
[[Architecture]]
If a link does nothing or macOS shows a permission message, open the linked file manually once with Open File so Telescopo receives permission to access it.